Friday 22 February 2013

How to edit anit-virus configuration?


On this tutorial you will learn how to edit anti-virus configuration.
Please Enjoy the video! :)
Everything explained step-by-step, so you should doesn't have any problem to understand.
Hope on this tutorial I helps you a littleby and now you are sure how to edit anti-virus configuration into your computer by your own.

Thank you, 

Bit by Bit Computer

How to create and reconfigure application toolbars?


Enjoy the video on which I will show you how to create an toolbars for your Internet Explorer 8 application. Follow step-by-step to makes that clearly. On tutorial is shows how to create your own toolbar to Internet Explorer 8 and also how to make it default if you decide to leave the original toolbar of your application!

Thank you,

Bit by Bit Computer

How to editing the desktop for person with visual impairment?


On this tutorial in the top you will learn how to editing desktop specially for the person with visual impairment. On tutorial is shows how to edit background, colour, size of icon and what type of icon choose specially for that person. Enjoy the tutorial, hope this helps you customize your own desktop specially for perso with visual impairment, maybe after you will need that to know. :)

Thank you,

Bit by Bit Computer

How to do the functionality test?

Hello everyone,
Today on my next tutorial I will show you two ways of do functionality test. The first way is a table where I write what you must do to test the functionality into your computer. The second way what I going to show you is 'short videos' on which I will show you how to check functionality into your computer. So the first way is making a pretty similar table to my on which you will write on each section about how software works or how this supposed to be works, and like I said the second way what I want to demonstrate into my tutorials is 'short videos' on each one to clear understand for everyone.

1. The correct data and time are set.
To check that the correct data and time are set into computer we must:
Click on windows clock, the clock is on the right down side on the Windows bar.
So click on it and then if time and data are not correct then we click on option below the clock and data 'change date and time settings' and on our screen will be come up window with date and time. There we have option 'change date and time' click on it and will be come up date and time where we can change it by yourself. If you change the actuall time and date and you are happy with it, click on 'OK' button and actuall date and time will be set.
 
2. Desktop shortcut go to the right place.
To check that shortcut goes to the right place we just must right click on icon for example on desktop and go to 'properties' and then if it's an shorcut we will see an 'location' of this file and that will show where this folder is. If we looking for original folder and we have shortcut of it on desktop, then 'right' mouse click on this folder and click 'properties' and we will seeing 'target' this shows where the original application or this what we looking for is originally installed and placed into our computer.

3. The correct device drivers are installed.
To check that on our computer the device drivers are installed we should just to do two things. On Windows 7 there are easy thing to follow to check all our device drivers what we have into computer installed. Go to start menu bar and find on bar slash 'devices and printers'. When we see that slash left mouse click on it and on our screen will be open an window with every devices and printers what we use and what we have installed into our computer. If on 'devices' and 'printer & faxes' slashes are every devices showing that automatically means everything are correctly installed.
    
4. Software application open and work as intended.
To check that our application are open and work as intended we first of all open the application for example (Microsoft Word) then two times click on the icon of that application and this should be opened. If it open, try do something on it to check that Word work as intended. If everything working fine on Word and you are happy with it that means your application are open and work as this should be works, but what if you double click on Microsoft Word and this occur on error or will doesn't want to opened? Then the easiest way to lauch work that program is uninstall that application and install it again, this should be help and after installed again should be working everything fine. So to uninstall any application no just an Microsoft Word we go to start menu bar and then 'control panel' , after it we go to 'programs' and 'uninstall a program'. We should see whole lists with every programs that we have on computer, find this application what not working correct and then on top left hand side you have to click 'uninstall' to delete that application from computer. Then if you want this application again use, you have to install it again into your computer. This should be helps you to run program if it's needed, just install it again and try run.

For (M3) criteria : 
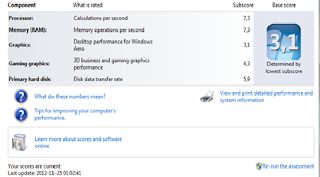
Here is a example of performance of  computer system. Maximum score is 7.9 and the lowest is 1.0. On processor section there are calculations per second rated and the subscore of my processor is 7,3. On the overall rating of 7.9 this processor have 7.3 score and this means processor is really fast, but it can be much faster and then on subscore will be total scale of 7.9, but 7.3 rating shows the processor what is so important are fast and working on high performance speed. On RAM section there are rated memory operations per second, overall score is always the same so it is 7.9, subscore of this RAM are 7.3. It means that RAM on this computer also working on fast performance, so on this point I can be happy. Nothing more to add on this section, everything working on higher performance. Next is graphic on which subscore is little bit lower, 3.1 of maximum 7.9 means that graphic on this computer working on lower performance and looking not too good, but basically as not tu bad as well. Subscore on graphic section is not too bad but basically is not rewarding. 4th component on this table is gaming graphic with subscore of 4.3 over 7.9, basically looking on other components that gaming graphic probably is not too bad, of course if person don't play games on this computer, but if play that could be little bit worried but you still can play on it, just you have lower performance of graphic on game. And the last component is primary hard disk which subscore is high 5.9. On this section was rated data transfer, so it means how fast transfer data is on it. Over 7.9 subscore of 5.9 are high, this automatically means the transfer date are fast, but well can be even faster than subscore of 5.9. Base score of overall scores is 3.1
 There was score current from 25/11/2012.

And here is upgraded version of the same performance. Processor and RAM memory stay on the same subscore as been before, graphics was before on 3.1 and now is going up to 4.2 on overall 7.9 score which is positive changing. Gaming graphic was 4.3 before, and now is up to 5.0. Primary hard disk stay as been before. And the base score was up to 4.2 which is fantastic changing again.
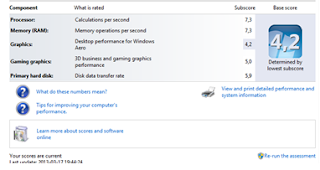
By one click on Re-run the assessment overall rating of system components increasing up. There are up base score which was 3.1 before and now is up to 4.2 , and also some others components just increase up by increasing overall performance of this computer. Everything change on positive way, by increase up the performance of my computer.
 There was score current from 17/03/2013.

Hope this helps,
Thank you,

Bit by Bit Computer,


How to install Open Office?


On these tutorial it will be explaining and showing step-by-step how to install an Open Office into your computer. Please follow the tutorial for clear installation, if you follow this tutorial you should doesn't have any problem with it. Whole process are easy but someone can't know how to do this and use correctly. So first of all 'download' free version from the internet of Open Office and then.... follow the tutorial for the rest of explanation.
Hope that video helps you, and now you are happy to install an Open Office by your own.

Thank you,

Bit by Bit Computer

How to create appropriate folder structure?


On this tutorial you will learn how to create a 'folder structure'. Everything I show step-by-step for you, so with my tutorial you should now create your own folder structure with doesn't have any problems with it.
Hope this helps you with creating your own folder structure.

Thank you,

Bit by Bit Computer

How to install and set up security software?


On this tutorial you will learn how to install and set up the security software (anti-virus). The whole process are easy to download and after it to set up and upgrade it. Everything are on the video, so you should doesn't have any problems with it.
Enjoy video..

Thank you,

Bit by Bit Computer

How to device drivers works?


On this video you will learn 'how to device drivers works' on Windows 7. They are automatically installed and updated, so you do need spend extra time to install them manually. The same is on Windows 8 drivers are automatically updated and installed.
On older version of Windows you have to install drivers manually by using a CD. On older version you will have every driver on CD so if you want to use something using your older system then you must install everything manually.

Thank you,

Bit by Bit Computer

Monday 18 February 2013

How to edit BIOS configuration?


Welcome again on my next short tutorial on which I will demonstrate you how to setting a BIOS password. I will explain everything on details step by step..
If we are ready then we can start of the beginning, this settings will be spend on about 5mins work ;-)
Okey we are ready, lets start of the first step ;-)..

So the first step you must open your BIOS in your computer, to do this you must click one of the keyboard button. On Windows 7 to open BIOS you must click 'F2', but it can be different on your system, so you should be click many buttons to find this one that can access you to BIOS.

1. When you already open your BIOS configuration you then must left mouse click on 'Security'.


 2. When you click on 'Security' you will see an options 'Set User Password'. To change our passwords we must left mouse click on this and after that on our screen will be come up a box where we must type in a new passwords.


3. The box looks like this on pictures behind. Here next step is to type in a new BIOS passwords. So when we already think about the new passwords and we are type in the new password on these box then...
 4. Then we have to confirm that passwords, what on simple words means, type this password again and click 'enter'.
 5. Now our passwords are changed and we have new user passwords sets on BIOS :)

6. If you are unhappy with your new passwords and you want to clear that passwords you just need to simply click on 'Clear User Password' which mean that when you click on this that your passwords will be clear..

Simply and really fast work (about 2-3mins) of 'how to change a BIOS passwords'
If you follow my tutorial you will doesn't have any problems with set up new passwords into your BIOS configuration.

Thank you for watching my tutorial on which I explain 'how to change a BIOS passwords'.
Hope that tutorial are helpful and useful for you, and now you can change a BIOS passwords :)

Bit by Bit Computer


How to install an Operating System?

 Hello!

Today on my next tutorial I want to show everyone how to install an Linux Ubuntu 12.0
Well that is not hard process to install an Linux but it will helps you making sure that everything is fine.
Everything will be showing step by step for clearly understanding.
Lets start! ;-)

1: Download for free from the Ubuntu official page free version of new Ubuntu 12.0
2: Safe it on USB and wait for download. It is about 800 MB.
3: After when your Ubuntu is already download on your USB, you can start installation.


First of all you will see that window on your screen.   That means you can change your original option on it. You can choose from two size of installation: 5 GB and 6 GB. I decided to install a 5 GB version. You can change the installation drive it means that you can choose where you want to install your Ubuntu, also choose size of installation and what is so important you can add the password to your username. If you change everything on this what you want to be you and if you sure everything is correct then your last step on this installation is click 'Install'.


After when we click 'Install' on screen will be window with Ubuntu Installer. On this windows every needed file what we will need to run Ubuntu are safed on 'drive'. On this process we will spend about 20mins, but don't worry! whole installation is going be maximum an 1 hours. Everything are installed now, so we can't used computer on this time :)

Well next step on installation is 'copying files' that means every files are copyied on your computer. On Ubuntu installation when you decided to install this operating system are few of windows with 'copying' and 'installing' some needed files and objects, so installation will be littleby long but not longer than (1,30hours) so don't worry :)

There is a last install window that are installing system on computer. Last installing window and we can use our new operating system. Installation of it will be not longer than 10mins.

After when installation is done, on our screen will be displayed a window the same like on pictures behind. You will need to reboot your computer to complete the instalation. You can reboot computer now or later. I decided to reboot my computer later, but this is your decision when you want to reboot your computer.
And the last step is when you choose when you want to reboot your computer click on finish button and your installation is fully complete! :)

After when your computer will be reboot and turned on then you can use your Ubuntu 12.0 on your computer. The screen will be look like that :)


Easy process but with my tutorial this can be easier, so if you are not sure about how to install an operating system into your computer, then you should read my tutorial.. everything are showing and writhing step by step for clearly understanding, specially for that type of people who needs that special help with install an operating system.. this will be great and needed example for you :)

Thank you everyone for follow my tutorials..
Hope this helps you install your own operating system into your machine.

Bit by Bit Computer


How to connect CD-DVD drive to your computer?


 Hello!

Today on my next tutorial I make little explanation about how to correctly install CD-DVD drive into computer. Sounds really complicate but with my tutorial it can be very helpful and useful for people who first time do this or don't know how to connect CD-DVD drive into computer. Well connect CD-DVD drive is work on about 20 minutes, sounds no real?? If you will follow my tutorial it can be real!! but you must do everything step by step like on my tutorial. So we are ready, and we can now start of the beginning ;-)


This is our CD-DVD drive what is already takes out from computer. First step what you need to do is find the area space to put your computer and all pieces what you will need.
After when you find some free space to put your computer and every pieces, your computer will be look the same like on this pictures of the computer after when you takes out your CD-DVD drive.
Now find the cables that you will need to connect with your drive. There are black cable ' connector ' and white cable that you must have when you want to connect your drive with rest of your computer.
Okey so next step is put your CD-DVD drive into computer and little by 'push' but remember don't push it too strong!! just push it little by (follow the pictures).
 After when you push your CD-DVD drive your computer will be look similar to this computer on pictures.
After when you pushed your CD-DVD drive look on cables that are connected with motherboard. You will see white and black connector that you must have to plug in drive with motherboard.


Next step when you already put your CD-DVD drive into space for drives you will see on the left and right hand side two screws that you must screw for give your drive stability.


Next step turn your CD-DVD drive to back for better seeing every ports that your drive have. Okey after when we already turned our drive and we see everything, find the white connector (with 3 different colors cables).

Here we can see next step what we should do, so put these white cable to right down side port and find the next connector (black).


Okey next, when you find the black connector of your CD-DVD drive you have to put it behind white connector on the right down side.


This black connector will be connect with drive the same like on pictures behind. Connect these two cables on CD-DVD drive and then connect it with motherboard by using the same cables.
That looks our computer after when we already put our CD-DVD drive into computer and connect with other parts. We are finished connect our drive into computer, so now we must check that everything working correct.


And the last step is, when we connect our computer and  CD-DVD drive works, that means you makes everything correct and now you can use your drive :-)


Hope this helps you and you now can connect your CD-DVD drive into computer and can use it with doesn't have any problems on it.. :)

Thank you

Bit by Bit Computer